Use Google Sheets as a Database - Node.js Contact Form Tutorial
No SQL, no database server, no cost. Learn how to use a Google Sheet as a database for a Node.js contact form — store submissions, read them back live, and dodge the credential gotchas the easy way.
Watch the full tutorial on my YouTube channel
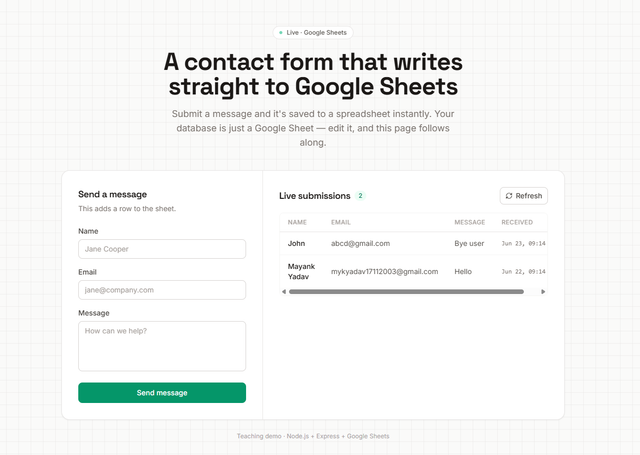
Need to store form submissions but spinning up a real database feels like overkill? Good news: you can use a Google Sheet as your database. It's free, your data lives in a spreadsheet you already know how to use, and non-technical teammates can read or edit it without ever touching code. In this tutorial we'll build a contact form with Node.js and Express that writes straight to a Google Sheet and reads it back live.
Why Use Google Sheets as a Database?
Here's the deal: not every project needs Postgres or MongoDB. If you're collecting contact form entries, building a waitlist, or shipping a quick MVP, a spreadsheet is often the perfect "database."
Why It Works So Well
- •Free, with zero servers to host or pay for
- •Your data is visible in a familiar spreadsheet
- •Anyone can edit a row by hand and the site follows
- •Sorting, filtering, charts and CSV export come built in
- •Perfect for contact forms, waitlists, and MVPs
When NOT to Use This
A spreadsheet isn't a replacement for a real database. Google Sheets has API rate limits, no real relationships or transactions, and it slows down past a few thousand rows. Use it for forms, prototypes, and small datasets. For heavy traffic, complex queries, or sensitive data at scale, reach for Postgres, MongoDB, or Firebase. Think of this as a shortcut, not a substitute.
The Two Methods
There are two ways to connect Node.js to Google Sheets. We'll start with the dead-simple one that needs zero credentials, then cover the official API approach for when you go to production.
Google Apps Script Web App
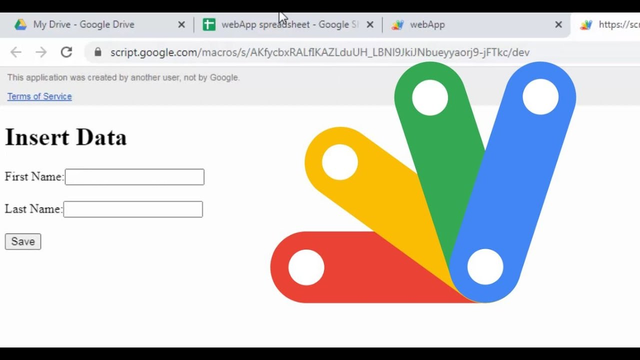
The easiest path, and my recommendation for learning. No service account, no API keys, no credentials file. You write a tiny script inside the sheet itself, and it becomes your API.
Step 1: Add the script
In your sheet, open Extensions → Apps Script, delete the placeholder, and paste this. It defines a GET endpoint that returns every row and a POST endpoint that appends a new one.
const SHEET_NAME = 'Sheet1';

// GET - return every row as JSON
function doGet() {
  const sheet = SpreadsheetApp.getActiveSpreadsheet().getSheetByName(SHEET_NAME);
  const rows = sheet.getDataRange().getValues().slice(1); // skip header
  const data = rows.map(function (r) {
    return { name: r[0], email: r[1], message: r[2], timestamp: r[3] };
  });
  return ContentService.createTextOutput(JSON.stringify(data))
    .setMimeType(ContentService.MimeType.JSON);
}

// POST - append a new row
function doPost(e) {
  const sheet = SpreadsheetApp.getActiveSpreadsheet().getSheetByName(SHEET_NAME);
  const body = JSON.parse(e.postData.contents);
  sheet.appendRow([
    body.name || '',
    body.email || '',
    body.message || '',
    new Date().toISOString()
  ]);
  return ContentService.createTextOutput(JSON.stringify({ success: true }))
    .setMimeType(ContentService.MimeType.JSON);
}
Step 2: Deploy it
Deployment steps:
- Click Deploy → New deployment
- Pick Web app as the type
- Set Execute as: Me
- Set Who has access: Anyone
- Click Deploy and authorize when prompted
- Copy the Web app URL ending in
/exec
That /exec URL is your permanent, forever-free database endpoint.
Step 3: Call it from Node
Your server just proxies requests to that URL. Notice there are no credentials anywhere, so this code runs on your laptop, a VPS, or anywhere with no setup.
const express = require('express');
const cors = require('cors');

const app = express();
app.use(cors());
app.use(express.json());
app.use(express.static('public'));

const SCRIPT_URL = 'YOUR_APPS_SCRIPT_EXEC_URL';

// read all rows
app.get('/api/contacts', async (req, res) => {
  const r = await fetch(SCRIPT_URL);
  res.json(await r.json());
});

// add a row
app.post('/api/contacts', async (req, res) => {
  const r = await fetch(SCRIPT_URL, {
    method: 'POST',
    headers: { 'Content-Type': 'application/json' },
    body: JSON.stringify(req.body),
  });
  res.status(201).json(await r.json());
});

app.listen(3000, () => console.log('http://localhost:3000'));
The gotcha that trips everyone up
If your requests return an HTML page instead of JSON (a Unexpected token < error), it's almost always one of two things: your deployment access isn't set to Anyone, or you copied the /dev URL instead of /exec. Paste the URL into an incognito window to check: JSON means you're good, a login screen means it's the access setting.
Google Sheets API + Service Account

The production approach. Your server talks to the official Sheets API using the googleapis package. More setup, but it scales better and keeps logic on your server.
Setup:
- In Google Cloud Console, enable the Google Sheets API
- Create a service account
- Share your sheet with the service account's email as Editor
- Install the package:
npm install express googleapis
const express = require('express');
const { google } = require('googleapis');

const app = express();
app.use(express.json());
app.use(express.static('public'));

const SPREADSHEET_ID = 'YOUR_SPREADSHEET_ID';
const SHEET_NAME = 'Sheet1';

const auth = new google.auth.GoogleAuth({
  scopes: ['https://www.googleapis.com/auth/spreadsheets'],
});

async function getSheets() {
  const client = await auth.getClient();
  return google.sheets({ version: 'v4', auth: client });
}

// read all rows
app.get('/api/contacts', async (req, res) => {
  const sheets = await getSheets();
  const result = await sheets.spreadsheets.values.get({
    spreadsheetId: SPREADSHEET_ID,
    range: SHEET_NAME + '!A2:D',
  });
  const rows = result.data.values || [];
  res.json(rows.map((r) => ({
    name: r[0] || '',
    email: r[1] || '',
    message: r[2] || '',
    timestamp: r[3] || '',
  })));
});

// add a row
app.post('/api/contacts', async (req, res) => {
  const { name, email, message } = req.body;
  const sheets = await getSheets();
  await sheets.spreadsheets.values.append({
    spreadsheetId: SPREADSHEET_ID,
    range: SHEET_NAME + '!A:D',
    valueInputOption: 'USER_ENTERED',
    requestBody: {
      values: [[name, email, message || '', new Date().toISOString()]],
    },
  });
  res.status(201).json({ success: true });
});

app.listen(3000, () => console.log('http://localhost:3000'));
Heads up: the service account key block
Many organizations now block downloading service account JSON keys (a policy called iam.disableServiceAccountKeyCreation). If you hit "An Organization Policy that blocks service account key creation has been enforced," don't fight it. You don't need the key file at all. Notice the code above has no keyFile: it relies on Application Default Credentials. Run gcloud auth application-default login for local dev, or attach the service account directly when you deploy to Cloud Run or a VM. These keyless methods are what Google actually recommends, and they're more secure.
Quick Comparison
| Method | Setup | Credentials | Best For |
|---|---|---|---|
| Apps Script | Very Easy | None | Demos, forms, MVPs, learning |
| Sheets API | Medium | Service account | Production apps, larger scale |
The Front End
Whichever method you pick, the browser side is identical: a normal form that POSTs to your endpoint, and a fetch that reads the rows back. Because the GET always pulls fresh from the sheet, editing a cell by hand shows up on the next load.
// send a new submission
async function sendMessage(data) {
  await fetch('/api/contacts', {
    method: 'POST',
    headers: { 'Content-Type': 'application/json' },
    body: JSON.stringify(data),
  });
}

// read all submissions - always live from the sheet
async function loadContacts() {
  const res = await fetch('/api/contacts');
  const contacts = await res.json();
  return contacts; // render however you like
}
Make edits show up automatically
Google Sheets doesn't push changes, so to reflect edits you make directly in the sheet, just poll on a timer: setInterval(loadContacts, 5000). Every five seconds the page re-reads the sheet. Great for a live demo on camera.
Final Thoughts
That's it. You've turned a spreadsheet into a working database with two endpoints. To recap which to reach for:
- Apps Script: fastest, no credentials, perfect for learning, forms, and MVPs
- Sheets API: the move when you go to production and want everything on your server
Neither is a silver bullet, but for blogs, portfolios, contact forms, and quick tools, this will save you from setting up a database you don't need yet. When you outgrow it, swapping in a real database is just changing what those two endpoints talk to.
Next Steps
- Add validation and a honeypot field to block spam bots
- Protect your Apps Script URL with a shared secret key
- Try updating and deleting rows, not just appending them
- Add a loading state and an empty state to your form UI
- Move to a real database once you cross a few thousand rows
Now go build something. Your spreadsheet has been a database this whole time, you just hadn't asked it yet. 🚀
Want More Practical Dev Tutorials?
Subscribe for no-fluff tutorials on web development, backend, and shipping real projects fast.